rear wheel bearing replacement
 03-05-05, 08:46 AM
#1
Lives on the Forum
Thread Starter
rear wheel bearing replacement
I had the left rear wheel bearing replaced about 17,000 miles ago when a rear wheel stud broke. You have to press out the wheel bearing to replace the studs and you can't press the bearing out without destroying it.
I noticed last weekend that the left rear spindle seemed loose when I was changing tires. Sure enough the wheel bearing was shot. Seems to me it would be quite impossible to eat a bearing so quickly so I figure the machine shop I had do the work at the time damaged the new bearing when they installed it. Now that I have my own hydraulic press replacing the bearing was a cinch; I finished in an hour and a half.
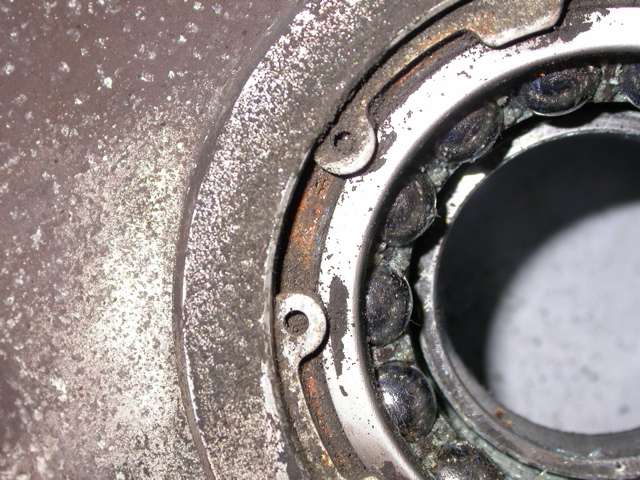
The rear wheel bearing is a typical sealed bearing with a split inner race. The bearing presses into the upright and then the spindle presses into the bearing. To remove the bearing have someone hold the brakes and bust the 35mm axle nut loose (I use a 24" breaker bar with a 36" length of pipe on the end). I don't bother to unstake the nut because it takes so much force to remove the nut I find you don't need to. If the axle has never been removed from the spindle it will most likely stick and refuse to come out. Soak the axle splines liberally with penetrating oil and try to hammer the axle out after letting it sit. If it still refuses to budge heat the spindle with a torch and try tapping it out again. Mine came out this time with just a few hard whacks of the hammer since it had been apart just a couple years ago and I was careful to clean the rust off when I reassmebled at the time. The axle and spindle are raw steel and surface corrosion tends to form on the splines and make them stick. Same as what happens when the brake rotors stick to the spindle.
Once the axle is loose of the spindle remove the brake caliper and the rotor. Then remove the abs sensor and the bolt through the outer toe control bushing. Now remove the upper and lower bolts on the upright which pass through the pillowball bushings. You now have the upright with its wheel bearing and spindle free of the car.
First the spindle has to be pressed out and this will destroy the wheel bearing as it must seperate for the spindle to come out. It doesn't take much force to get the spindle out and I just supported the upright on the press with a couple blocks of wood. Press the spindle out using a socket just smaller in diameter than the spindle and the spindle will pop out right away. You'll notice that one of the inner races of the wheel bearing is still attached to the spindle. Set it aside for now.
With the spindle out you now see a large c-clip which holds the wheel bearing in the upright. Remove the clip. Support the upright in the press once again and drive the bearing out by using a socket large enough to press against the outer of the bearing. Always remove/install bearings by only pressing them from their outer edges or you will damage them! My bearing acted stuck at first but once it broke free it pressed out easily.
Thoroughly clean the bearing bore of the upright as well as the groove the c-clip sits in. Now it's time to press in the new bearing. I used the remains of the old bearing to press the new one in. Do not ever press on anything but the outer diameter of the bearing or you will damage it! The new bearing will press easily into the upright; be certain it's driving in square. Once the bearing is seated fully insert the c-clip to hold it in place.
Now you have to remove the bearing race that is stuck to your spindle. The FSM says to grind a notch most of the way through the race and then use a hammer and chisel to break the race off the spindle. I was able to remove mine with a bearing seperator and a gear puller without much trouble. Once the old bearing race is removed the spindle is ready to be installed. You might consider replacing the wheel studs before installing the spindle; they hammer out easily.
Since the spindle presses into the inner race of the bearing you want to support the inner race when the spindle is installed or risk damage to the bearing. I supported the inner race from the rear with a suitable socket sitting on the press and then pressed in the spindle. It will slip in pretty easily. It is my theory that this is how the shop damaged my old bearing. If you don't support the inner race when you press the spindle in then the race will try and seperate slightly from the bearing. This will destroy the bearing quickly.
All done, just install the upright back on the car. Be certain to use a new axle nut. The nut is so tight that they are normally slightly damaged whenever they are removed.
I jacked the car up and removed the rear wheel at 4:30 and had the car off the stands by 6. The only real hurdle in the entire project is getting the axle free of the spindle as they usually stick. This project could easily take twice as long if you have trouble getting the axle free. I had one stick so bad a while back that I mushroomed the end in trying to hammer it out. Don't do that if the axle doesn't turn loose after half a dozen hard whacks I would try heating it with a torch. I had to grind the "mushroom" off the axle at the time in order to install the axle nut again.
I noticed last weekend that the left rear spindle seemed loose when I was changing tires. Sure enough the wheel bearing was shot. Seems to me it would be quite impossible to eat a bearing so quickly so I figure the machine shop I had do the work at the time damaged the new bearing when they installed it. Now that I have my own hydraulic press replacing the bearing was a cinch; I finished in an hour and a half.
The rear wheel bearing is a typical sealed bearing with a split inner race. The bearing presses into the upright and then the spindle presses into the bearing. To remove the bearing have someone hold the brakes and bust the 35mm axle nut loose (I use a 24" breaker bar with a 36" length of pipe on the end). I don't bother to unstake the nut because it takes so much force to remove the nut I find you don't need to. If the axle has never been removed from the spindle it will most likely stick and refuse to come out. Soak the axle splines liberally with penetrating oil and try to hammer the axle out after letting it sit. If it still refuses to budge heat the spindle with a torch and try tapping it out again. Mine came out this time with just a few hard whacks of the hammer since it had been apart just a couple years ago and I was careful to clean the rust off when I reassmebled at the time. The axle and spindle are raw steel and surface corrosion tends to form on the splines and make them stick. Same as what happens when the brake rotors stick to the spindle.
Once the axle is loose of the spindle remove the brake caliper and the rotor. Then remove the abs sensor and the bolt through the outer toe control bushing. Now remove the upper and lower bolts on the upright which pass through the pillowball bushings. You now have the upright with its wheel bearing and spindle free of the car.
First the spindle has to be pressed out and this will destroy the wheel bearing as it must seperate for the spindle to come out. It doesn't take much force to get the spindle out and I just supported the upright on the press with a couple blocks of wood. Press the spindle out using a socket just smaller in diameter than the spindle and the spindle will pop out right away. You'll notice that one of the inner races of the wheel bearing is still attached to the spindle. Set it aside for now.
With the spindle out you now see a large c-clip which holds the wheel bearing in the upright. Remove the clip. Support the upright in the press once again and drive the bearing out by using a socket large enough to press against the outer of the bearing. Always remove/install bearings by only pressing them from their outer edges or you will damage them! My bearing acted stuck at first but once it broke free it pressed out easily.
Thoroughly clean the bearing bore of the upright as well as the groove the c-clip sits in. Now it's time to press in the new bearing. I used the remains of the old bearing to press the new one in. Do not ever press on anything but the outer diameter of the bearing or you will damage it! The new bearing will press easily into the upright; be certain it's driving in square. Once the bearing is seated fully insert the c-clip to hold it in place.
Now you have to remove the bearing race that is stuck to your spindle. The FSM says to grind a notch most of the way through the race and then use a hammer and chisel to break the race off the spindle. I was able to remove mine with a bearing seperator and a gear puller without much trouble. Once the old bearing race is removed the spindle is ready to be installed. You might consider replacing the wheel studs before installing the spindle; they hammer out easily.
Since the spindle presses into the inner race of the bearing you want to support the inner race when the spindle is installed or risk damage to the bearing. I supported the inner race from the rear with a suitable socket sitting on the press and then pressed in the spindle. It will slip in pretty easily. It is my theory that this is how the shop damaged my old bearing. If you don't support the inner race when you press the spindle in then the race will try and seperate slightly from the bearing. This will destroy the bearing quickly.
All done, just install the upright back on the car. Be certain to use a new axle nut. The nut is so tight that they are normally slightly damaged whenever they are removed.
I jacked the car up and removed the rear wheel at 4:30 and had the car off the stands by 6. The only real hurdle in the entire project is getting the axle free of the spindle as they usually stick. This project could easily take twice as long if you have trouble getting the axle free. I had one stick so bad a while back that I mushroomed the end in trying to hammer it out. Don't do that
if the axle doesn't turn loose after half a dozen hard whacks I would try heating it with a torch. I had to grind the "mushroom" off the axle at the time in order to install the axle nut again.
 03-06-05, 02:17 AM
#2
Banned. I got OWNED!!!
Join Date: Jul 2004
Location: next to the polishing wheel!!!
Posts: 1,179
Likes: 0
Received 1 Like
on
1 Post
DamonB , nice write up and no one thanked you . I have pressed bearings and care is a must ,Paul has bought a set for his rear hub,which we will put in when time permits . Nice write up .
03-12-05, 08:50 PM
#3
Eats, Sleeps, Dreams Rotary
Damon, great write-up...
I'm trying to get my dust shields on so need to get the wheelhub off...when you say you whack it...where the heck are you hitting it at??? I'm not sure where to start to beat this thing from.
I don't need the axel out just from the wheel side.
Turbojeff had this quote from an old thread but am having a hard time visualizing how to do this.
The axles just pop out of the diff. You might damage the seal, and the exhaust side one is prone to leakage anyway.
On the wheel side I keep one old "beater" nut around to beat the axle out of the hub. Loosen the nut a little and start pounding. Make sure that you leave the nut threaded on most of the way otherwise the nut will damage the threads.
On the wheel side I keep one old "beater" nut around to beat the axle out of the hub. Loosen the nut a little and start pounding. Make sure that you leave the nut threaded on most of the way otherwise the nut will damage the threads.
Last edited by 7racer; 03-12-05 at 08:54 PM.
03-12-05, 09:10 PM
#4
Eats, Sleeps, Dreams Rotary
Join Date: May 2003
Location: MIA
Posts: 3,639
Likes: 0
Received 0 Likes
on
0 Posts
Damon I have a friend that eats up wheel bearings when he trail brakes in his WRX, I have no idea why, maybe more stress and heat or w/e. Good write up, Im going to be doing this soon on my 144k chassis.
03-13-05, 10:44 AM
#5
apex seal BBQ
Join Date: Sep 2002
Location: AL
Posts: 867
Likes: 0
Received 0 Likes
on
0 Posts
Originally Posted by DamonB
I had one stick so bad a while back that I mushroomed the end in trying to hammer it out. Don't do that if the axle doesn't turn loose after half a dozen hard whacks I would try heating it with a torch. I had to grind the "mushroom" off the axle at the time in order to install the axle nut again.
if the axle doesn't turn loose after half a dozen hard whacks I would try heating it with a torch. I had to grind the "mushroom" off the axle at the time in order to install the axle nut again.
Again, great write up. Hopefully I won't have to take apart the rear again for a while now...


 03-14-05, 08:22 AM
#7
Lives on the Forum
Thread Starter
Originally Posted by 7racer
Damon, great write-up...
I'm trying to get my dust shields on so need to get the wheelhub off...when you say you whack it...where the heck are you hitting it at???
I'm trying to get my dust shields on so need to get the wheelhub off...when you say you whack it...where the heck are you hitting it at???
Realize you can't remove the dust sheilds without replacing the wheel bearing because you have to remove the spindle to remove the sheild. If you need the dust sheilds gone so you can install your brake kit just cut them off, that way you don't have to take the axle apart or replace the bearing.
Trending Topics
03-14-05, 11:06 AM
#9
Lives on the Forum
Thread Starter
Originally Posted by jimlab
Now if Damon only had a digital camera...
03-14-05, 11:08 AM
#10
Eats, Sleeps, Dreams Rotary
Originally Posted by DamonB
You hammer the end of the axle where the big nut was. Remove the nut and then hammer the axle out of the spindle. Be careful not to miss with the hammer and whack the spindle. If you bend the little lip there your wheels will no longer seat correctly.
Realize you can't remove the dust sheilds without replacing the wheel bearing because you have to remove the spindle to remove the sheild. If you need the dust sheilds gone so you can install your brake kit just cut them off, that way you don't have to take the axle apart or replace the bearing.
Realize you can't remove the dust sheilds without replacing the wheel bearing because you have to remove the spindle to remove the sheild. If you need the dust sheilds gone so you can install your brake kit just cut them off, that way you don't have to take the axle apart or replace the bearing.
03-14-05, 11:13 AM
#11
Lives on the Forum
Thread Starter
Originally Posted by 7racer
Is that the same for the front dust shields? It seems different int he FSM.
03-14-05, 11:16 AM
#12
Eats, Sleeps, Dreams Rotary
Originally Posted by DamonB
The front dust sheilds can be removed by first pulling the entire bearing and hub assembly off. You can re-install the same parts afterwards as they are not harmed in removal. Only the rear requires pressing and damaging the bearing.
and I second the comment about getting a camera for when your wrenching
03-14-05, 02:46 PM
#13

My 2cents on removing the axle.
A. If you are going to hammer, take the old hub nut and put it on backwards and hammer that. You may have to bend/grind out the stake.
B. IMHO, Excessive hammering may damage your pillowball bushings. There are gear pullers and hub pullers you can buy. After some hammering, I had luck using my old cheap 3 arm gear puller and alot of torque.
I broke a 1/2in drive breaker bar trying to get my hub nut off.
03-14-05, 03:02 PM
#14
Lives on the Forum
Thread Starter
Originally Posted by flunkysama
My 2cents on removing the axle.
A. If you are going to hammer, take the old hub nut and put it on backwards and hammer that. You may have to bend/grind out the stake.
A. If you are going to hammer, take the old hub nut and put it on backwards and hammer that. You may have to bend/grind out the stake.
I also assume if you used a 3 jaw puller that you attached it to the spindle (where the wheel bolts on) to push the axle out. You can easily bend the spindle in that case and end up with a wheel that permanently wobbles.
Last edited by DamonB; 03-14-05 at 03:06 PM.
05-15-05, 10:19 PM
#15
Eats, Sleeps, Dreams Rotary
Much thanks Damon for helping remove my rear bearings to put on the dust shields. Also it was a fortuitous thing as we fount that my right rear bearing was bad!!!! After we removed it you could easily feel the bearing "wobbled". Also when turning the hub, you could hear/feel it "grinding"
So anyways here are some pics.
So anyways here are some pics.
05-15-05, 10:27 PM
#16
Eats, Sleeps, Dreams Rotary
So as Damon stated you want to hit with a hammer right on the axle, driving the axle toward the diff (after you remove the 35mm axle nut). Mine had been removed before so it was extremely easy.
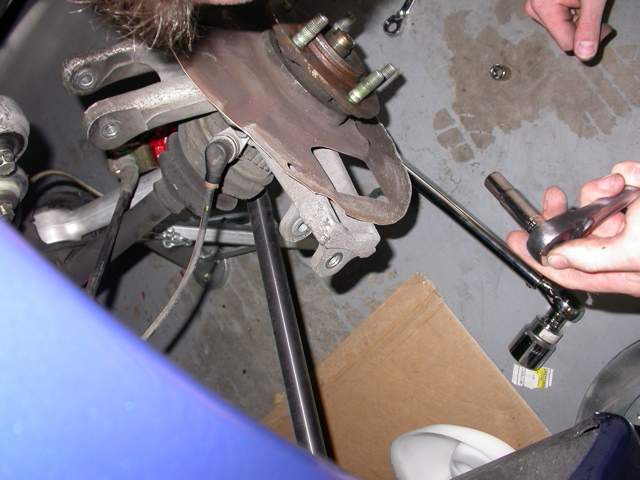
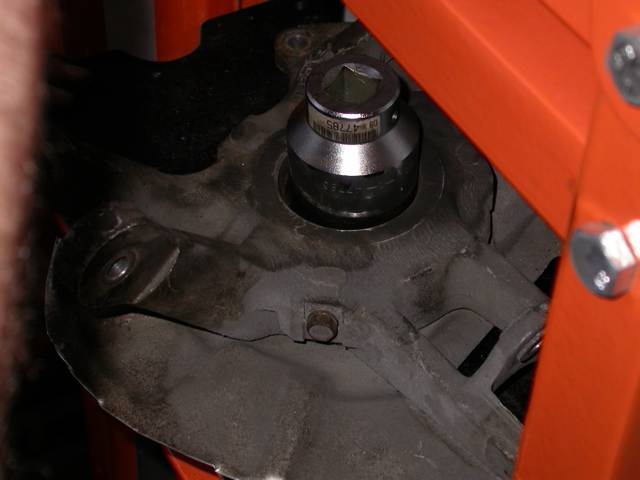
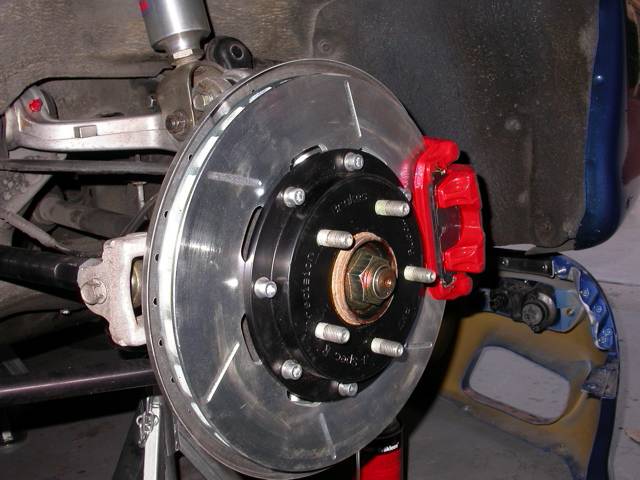
Here the axle has been loosen and the brake caliper and rotor has been removed.
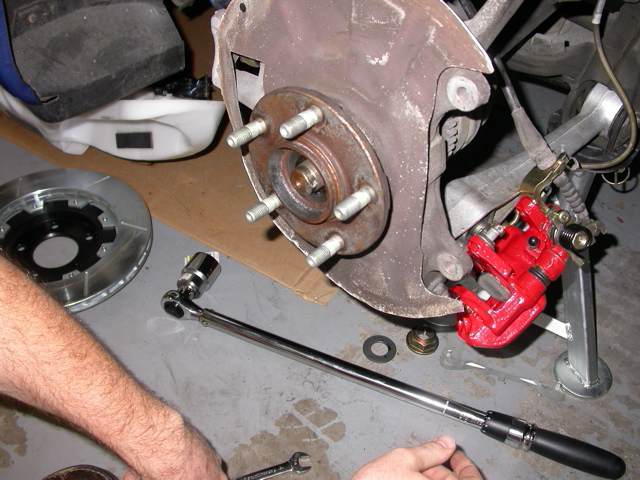
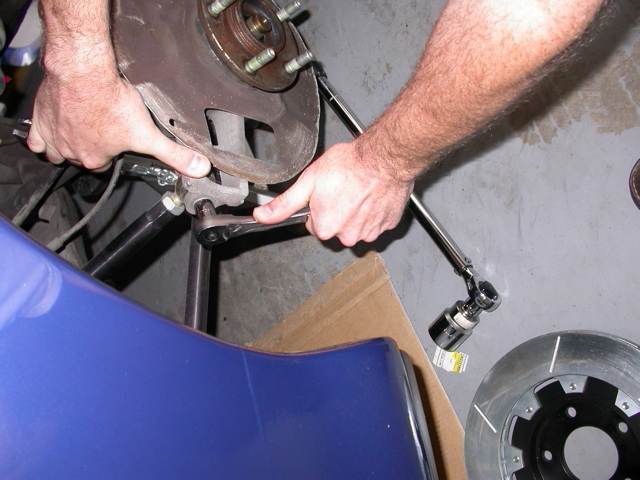
Remove the upper hub mount and lower mount:
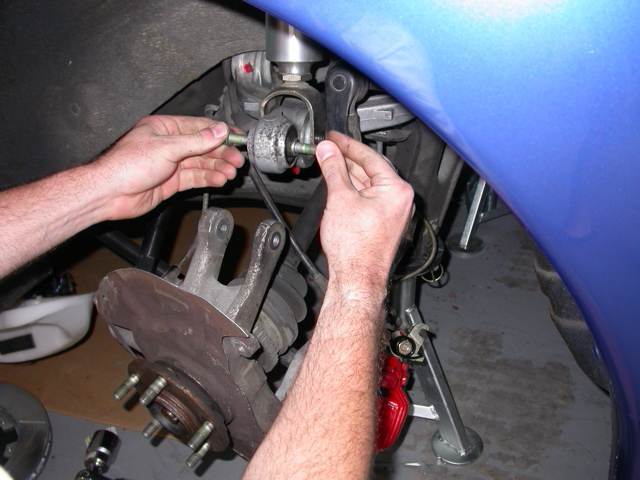
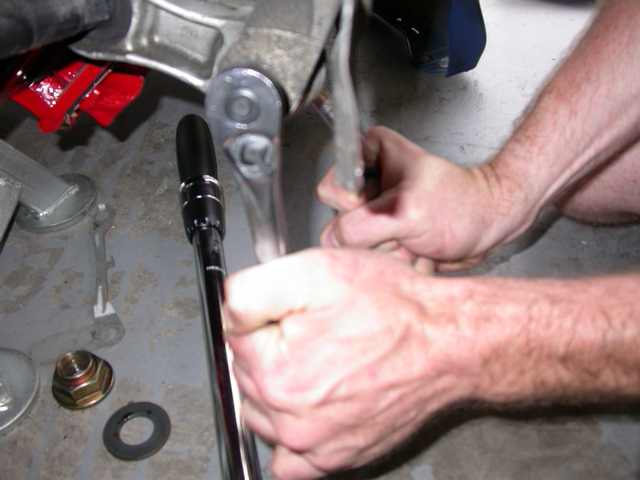
Remove the toe link bolt (you don't have to remove the whole thing just the bolt connected to the hub:
Remove the ABS sensor:
Here the axle has been loosen and the brake caliper and rotor has been removed.
Remove the upper hub mount and lower mount:
Remove the toe link bolt (you don't have to remove the whole thing just the bolt connected to the hub:
Remove the ABS sensor:
Last edited by 7racer; 05-15-05 at 10:32 PM.
05-15-05, 10:37 PM
#17
Eats, Sleeps, Dreams Rotary
Here you can see the splines after the hub has been removed. This is what Damon was mentioning to try to liberally lube before you try to knock the axle out:
Here you can see the removed hub (with my poorly trimmed dust shield)

Here you can see the removed hub (with my poorly trimmed dust shield
)
05-15-05, 10:48 PM
#18
Eats, Sleeps, Dreams Rotary
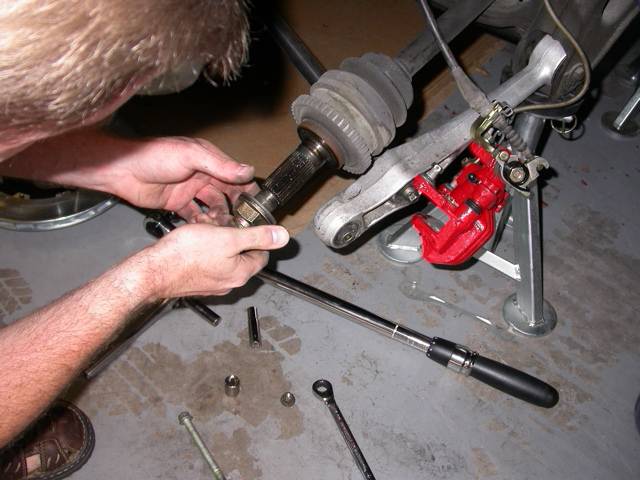
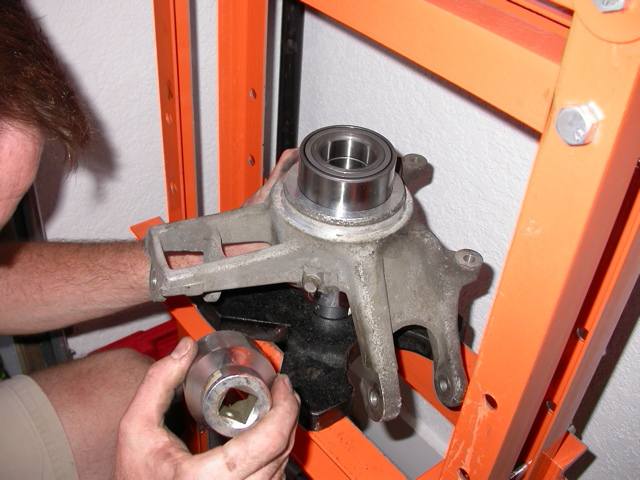
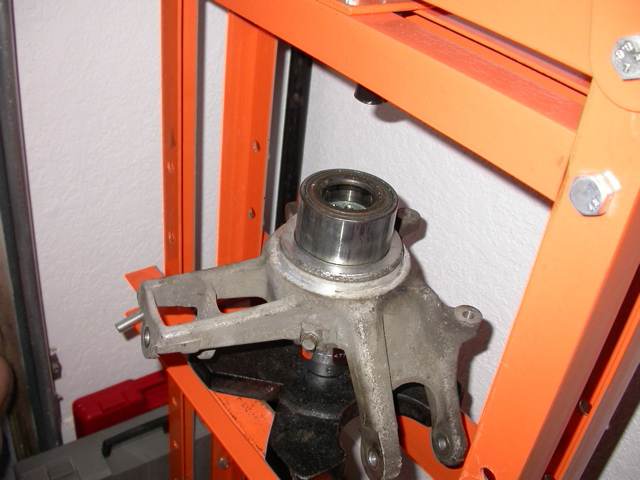
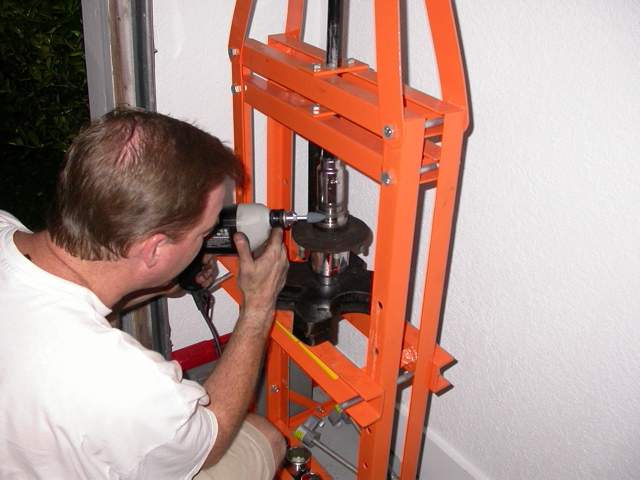
Off to the press...
First press the spindle out (destroying the bearing):
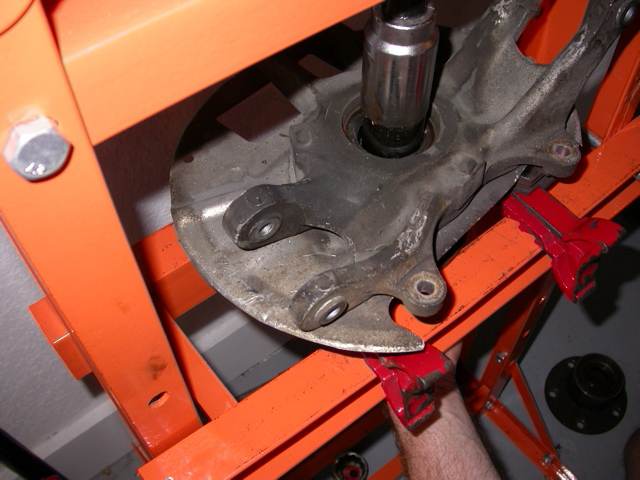
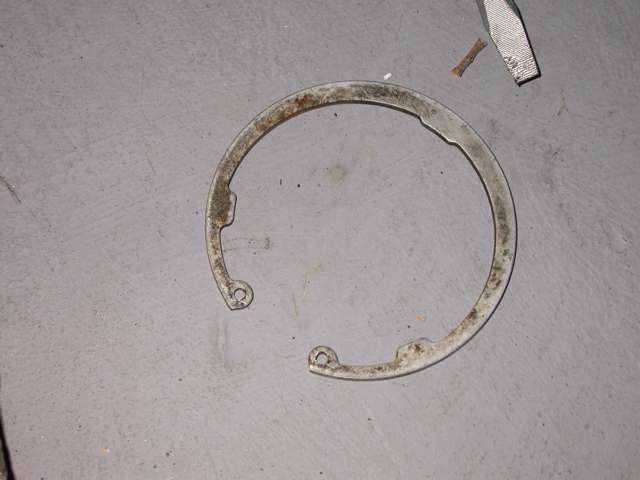
Remove the "C" clip that is holding the wheel bearing in the spindle. Damon used some needle nose pliers while I worked in a small screwdriver to keep it from popping back in. Damon then worked the clip around until it released:
Also per Damon Always remove/install bearings by only pressing them from their outer edges or you will damage them!. Here we are pressing the bearing out:
After we cleaned the c-clamp groove and bore, we proceed to press the new one in (second pic is one using an old bearing to press the new one in fully until it seats:
First press the spindle out (destroying the bearing):
Remove the "C" clip that is holding the wheel bearing in the spindle. Damon used some needle nose pliers while I worked in a small screwdriver to keep it from popping back in. Damon then worked the clip around until it released:
Also per Damon Always remove/install bearings by only pressing them from their outer edges or you will damage them!. Here we are pressing the bearing out:
After we cleaned the c-clamp groove and bore, we proceed to press the new one in (second pic is one using an old bearing to press the new one in fully until it seats:
Last edited by 7racer; 05-15-05 at 10:56 PM.
05-15-05, 11:07 PM
#20
Eats, Sleeps, Dreams Rotary
Now you have to remove the bearing race that is stuck to the spindle. While Damon was able to remove his with a gear puller we couldn't on mine. It seems that the 93 and 94's are slightly different. My 94 didn't have enough of a "lip" if any at all to attach the gear puller.
Here Damon is trying to grind a notch. The grinder was a little weak. However, he was able to grind it off with another grinder at work:
I don't have pictures of when Damon pressed the spindle into the inner race. However, as he noted...support the inner race when the spindle is installed or risk damage to the bearing. I supported the inner race from the rear with a suitable socket sitting on the press and then pressed in the spindle. It will slip in pretty easily. It is my theory that this is how the shop damaged my old bearing. If you don't support the inner race when you press the spindle in then the race will try and seperate slightly from the bearing. This will destroy the bearing quickly.
Last edited by 7racer; 05-15-05 at 11:12 PM.
05-15-05, 11:18 PM
#21
Eats, Sleeps, Dreams Rotary
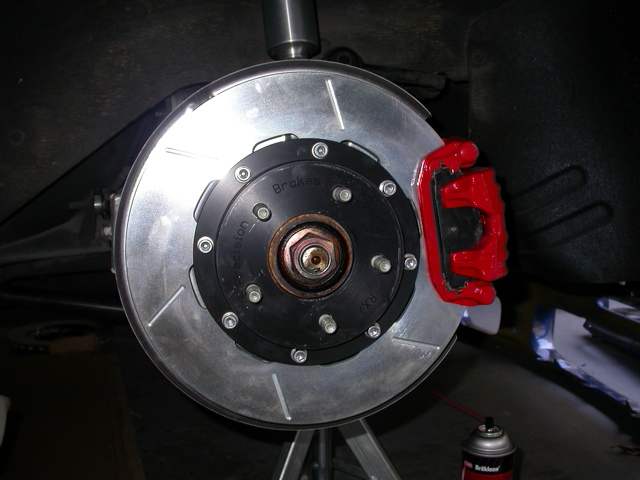
Finally, reverse the order to install. Use a new axle nut and notch it.
Thanks Damon for all of the help!!!!
Here is the finally install with new dust shields and 99 spec brakes installed.
Thanks Damon for all of the help!!!!
Here is the finally install with new dust shields and 99 spec brakes installed.
05-15-05, 11:26 PM
#23
Full Member

Join Date: Mar 2004
Location: louisiana
Posts: 105
Likes: 0
Received 0 Likes
on
0 Posts
Excellent post fellas. Here is a little tip to make installation easier: Take the new bearing and put in a box of dry ice for about an hour to shrink the metal. If your quick enough, the new bearing will drop right in place without even needing a press. Even putting it in the freezer overnight will make it easier.
05-16-05, 05:49 PM
#25
Eats, Sleeps, Dreams Rotary
Originally Posted by DamonB
Bob, you forgot to mention our custom sewer accessories to press the dust sheild on! 
LOL. I forgot, to press in the shields you can't just push them on. Also the metal is too flimsy that you can bend the shields easily.
Instead we went to our local mazda accessory store...Lowe's
 and bought some nice PVC crapper tube!! All you need is a 4" diameter tube. We found one that fit perfectly.
We just set the PVC over the dust shield and put it on the press and pressed the shield onto the hub! Worked out GREAT!
*the PVC is up for sale CHEAP if anyone wants it

